2017-07-20 springMVC-02
Springmvc第二天
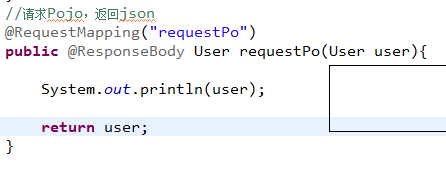
@responseBody和@RequestBody
@responseBody把后台pojo转换json对象,返回到页面。
@RequestBody接受前台json数据,把json数据自动封装javaBean
导入json的jar
修改springmvc

页面传递json格式
Ajax传递 json格式数据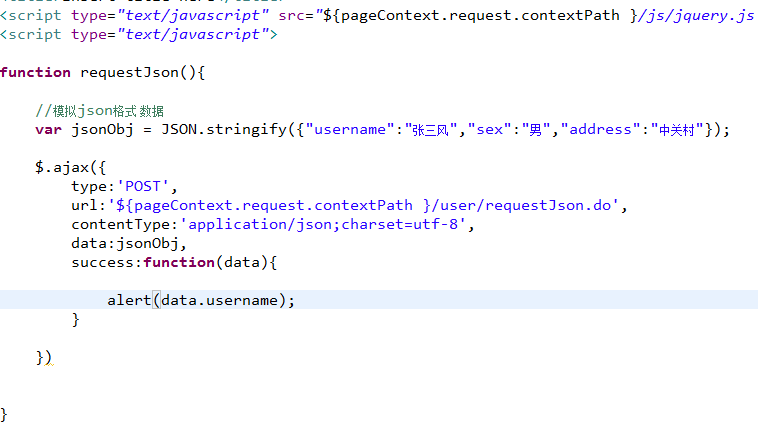
后台代码
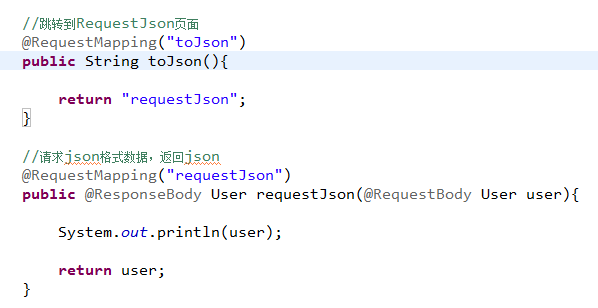
需求:pojo,后台返回json
前台请求数据构造:key=value&key=value.
页面
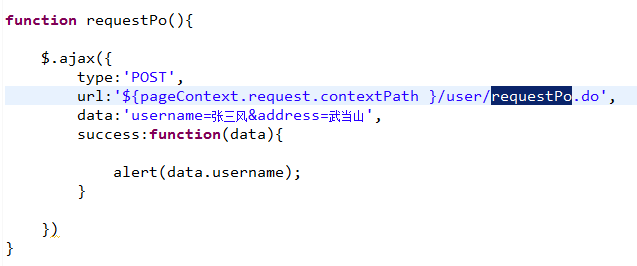
代码
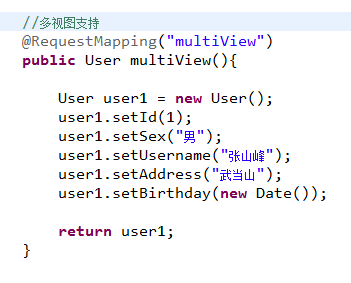
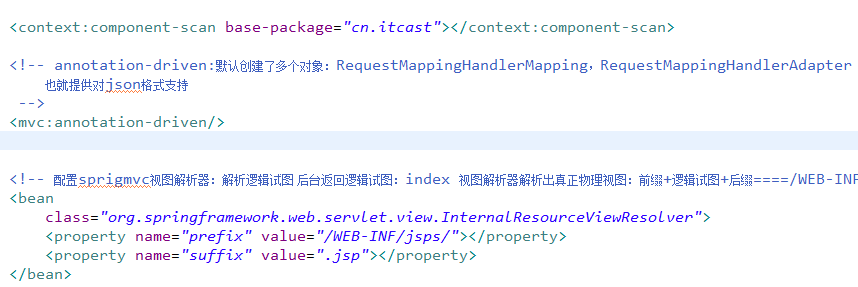
Springmvc多视图
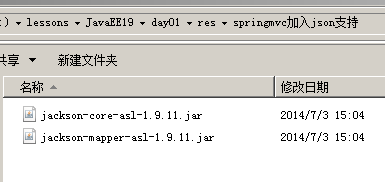
导入xml格式支持jar
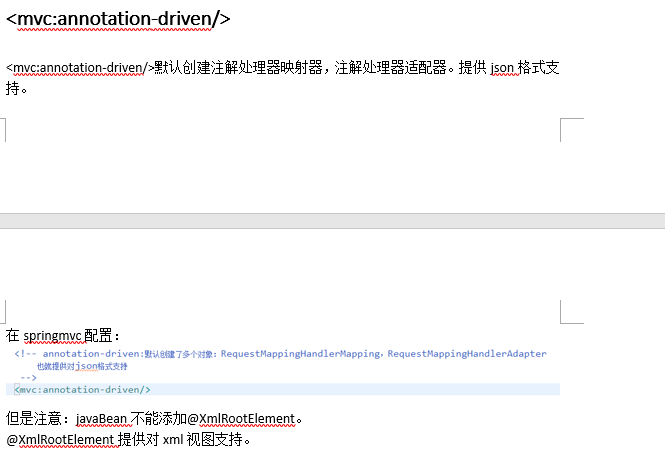
配置springmvc支持多视图

<bean class="org.springframework.web.servlet.view.ContentNegotiatingViewResolver">
    <!-- 配置支持媒体类型 -->
    <property name="contentNegotiationManager">
    <bean class="org.springframework.web.accept.ContentNegotiationManagerFactoryBean">
    <property name="mediaTypes">
    <map>
    <entry key="json" value="application/json"></entry>
    <entry key="xml" value="application/xml"></entry>
    </map>
    </property>

    </bean>

    </property>

    <!-- 指定默认视图 -->
    <property name="defaultViews">
    <!-- 支持多个视图 -->
    <list>
    <!-- 对josn格式视图支持 -->
    <bean class="org.springframework.web.servlet.view.json.MappingJacksonJsonView"></bean>

    <!-- xml格式视图支持 -->
    <bean class="org.springframework.web.servlet.view.xml.MarshallingView">
    <constructor-arg>
    <bean class="org.springframework.oxm.jaxb.Jaxb2Marshaller">
    <property name="classesToBeBound">
    <list>
    <value>cn.itcast.domain.User</value>
    </list>
    </property>
    </bean>
    </constructor-arg>
    </bean>

    </list>

    </property>
    </bean>
代码
访问
约定rest目录下所有以json和xml扩展名都支持相应的视图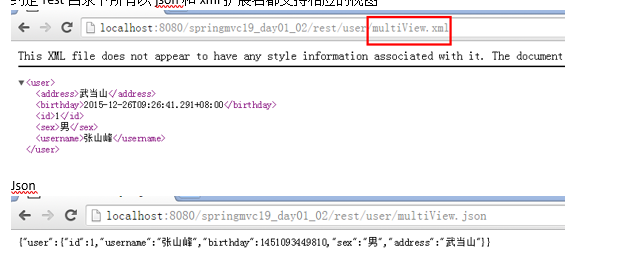
Ssm
导入jar

导入spring(包含springmvc),mybatis,mybatis-spring整合。数据库驱动,jstl,c3p0管理数据源,log4j.
创建一个web工程并导入jar
配置web.xml入门文件
加载springmvc配置文件
加载spring配置文件
<?xml version="1.0" encoding="UTF-8"?>
<beans xmlns="http://www.springframework.org/schema/beans"
xmlns:xsi="http://www.w3.org/2001/XMLSchema-instance" xmlns:mvc="http://www.springframework.org/schema/mvc"
xmlns:context="http://www.springframework.org/schema/context"
xmlns:aop="http://www.springframework.org/schema/aop" xmlns:tx="http://www.springframework.org/schema/tx"
xsi:schemaLocation="http://www.springframework.org/schema/beans
    http://www.springframework.org/schema/beans/spring-beans-3.2.xsd
    http://www.springframework.org/schema/mvc
    http://www.springframework.org/schema/mvc/spring-mvc-3.2.xsd
    http://www.springframework.org/schema/context
    http://www.springframework.org/schema/context/spring-context-3.2.xsd
    http://www.springframework.org/schema/aop
    http://www.springframework.org/schema/aop/spring-aop-3.2.xsd
    http://www.springframework.org/schema/tx
    http://www.springframework.org/schema/tx/spring-tx-3.2.xsd">

    <context:component-scan base-package="cn.itcast"></context:component-scan>

<!-- 第一步:配置数据源 -->
<context:property-placeholder location="classpath:jdbc.properties" />
<bean id="dataSource" class="com.mchange.v2.c3p0.ComboPooledDataSource">
    <property name="jdbcUrl" value="${jdbc.url}"></property>
    <property name="driverClass" value="${jdbc.driver}"></property>
    <property name="user" value="${jdbc.username}"></property>
    <property name="password" value="${jdbc.password}"></property>

</bean>

<!-- 第二步:创建sqlSessionFactory。生产sqlSession -->
<bean id="sqlSessionFactory" class="org.mybatis.spring.SqlSessionFactoryBean">
<property name="dataSource" ref="dataSource"></property>
<property name="configLocation" value="classpath:sqlMapConfig.xml"></property>
</bean>
<!-- 配置mybatis接口代理开发
    * 接口类名和映射文件必须同名
    * 接口类和映射文件必须在同一个目录 下
    * 映射文件namespace名字必须是接口的全类路径名
    * 接口的方法名必须和映射Statement的id一致
 -->
 <bean class="org.mybatis.spring.mapper.MapperScannerConfigurer">
 <property name="basePackage" value="cn.itcast.dao"></property>
 <property name="sqlSessionFactoryBeanName" value="sqlSessionFactory"></property>
 </bean>


<!-- 第三步:事务 -->
<bean id="transactionManager" class="org.springframework.jdbc.datasource.DataSourceTransactionManager">
<property name="dataSource" ref="dataSource"></property>
</bean>

<!-- 配置通知 -->
<tx:advice id="txAdvice" transaction-manager="transactionManager">
<tx:attributes>
<tx:method name="save*" propagation="REQUIRED" />
<tx:method name="update*" propagation="REQUIRED" />
<tx:method name="delete*" propagation="REQUIRED" />
<tx:method name="insert*" propagation="REQUIRED" />
<tx:method name="*" propagation="REQUIRED" />
</tx:attributes>

</tx:advice>

<!-- 配置拦截service -->
<aop:config>
<aop:advisor advice-ref="txAdvice" pointcut="execution(* cn.itcast.service.*.*(..))"/>
</aop:config>
</beans>
使用sqlGenarator自动生产。
Service层:
@Resource
private ItemsMapper itemsMapper;

public List<Items> findAll() {
    List<Items> list =     itemsMapper.findAll();
    return list;
}

public Items findByID(Integer id) {
    Items items = itemsMapper.selectByPrimaryKey(id);
    return items;
}

public void saveOrUpdate(Items items) {

    itemsMapper.updateByPrimaryKey(items);

}

public void deleteByID(Integer id) {
    itemsMapper.deleteByPrimaryKey(id);
}
Controller
package cn.itcast.controller;

import java.util.List;

import javax.annotation.Resource;

import org.springframework.stereotype.Controller;
import org.springframework.ui.Model;
import org.springframework.web.bind.annotation.RequestMapping;

import cn.itcast.domain.Items;
import cn.itcast.service.ItemsService;

@Controller
@RequestMapping("/items")
public class ItemsController {

@Resource
private ItemsService itemsService;

//查询所有商品
@RequestMapping("list")
public String list(Model model){

    List<Items> list = itemsService.findAll();

    model.addAttribute("itemsList", list);

    return "itemsList";

}
//跳转到修改页面
@RequestMapping("edit")
public String edit(Integer id , Model model){

    //根据Id查询商品
    Items items = itemsService.findByID(id);
    //页面回显
    model.addAttribute("item", items);

    return "editItem";
}

@RequestMapping("saveOrUpdate")
public String saveOrUpdate(Items items){

    itemsService.saveOrUpdate(items);

    return "redirect:list.do";
}

//根据Id进行删除
@RequestMapping("deleteByID")
public String deleteByID(Integer id)
{
    itemsService.deleteByID(id);

    return "redirect: list.do";
}

//批量删除
@RequestMapping("deleteByIds")
public String deleteByIds(Integer[] id){

    for(Integer ids : id){

        itemsService.deleteByID(ids);
    }


    return "redirect: list.do";
}


}
Springmvc文件上传
导入jar
跨服务器上传文件jar。Io,fileupload
上传图片,图片里面回显。Ajax。页面不刷新图片回显。
Ajax能不能提交表单?

<img src=”图片路径”/>
//把文件关联表单
//触发ajax事件
<input type=file onchange=“ajax事件”/>
<input type=”hidden” value=”图片相对路径”/>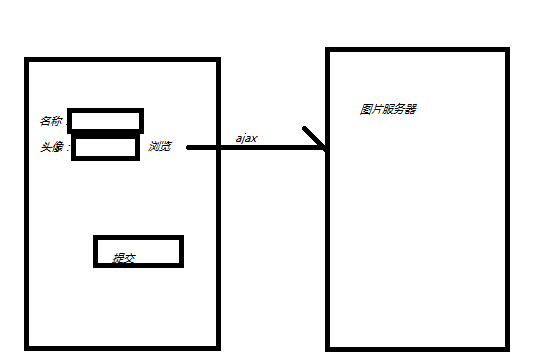
模拟2台服务器:
创建一个项目,图片服务器项目,图片服务器和上传图片的项目端口不一致。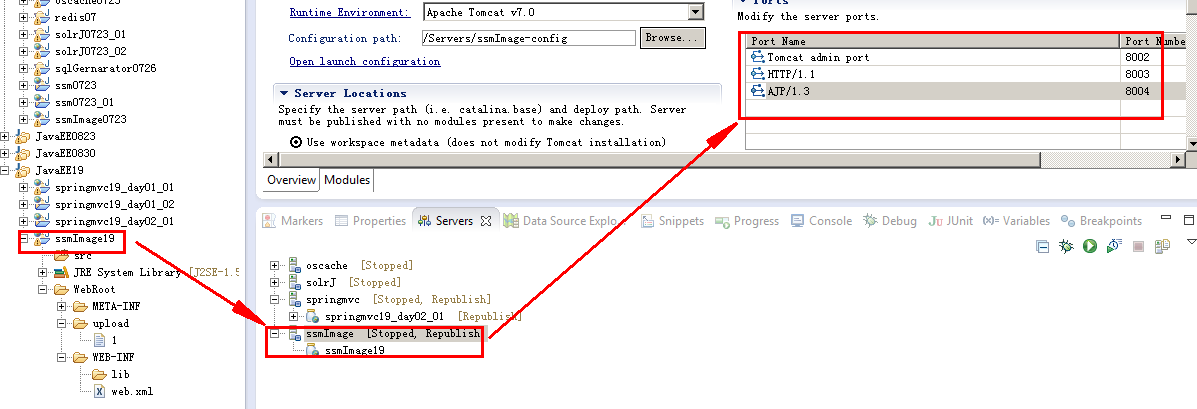
开启文件上传
Springmvc配置文件配置支持文件上传类:
页面ajax
发送请求,上传图片:图片被关联表单。提交表单:jquery.form.js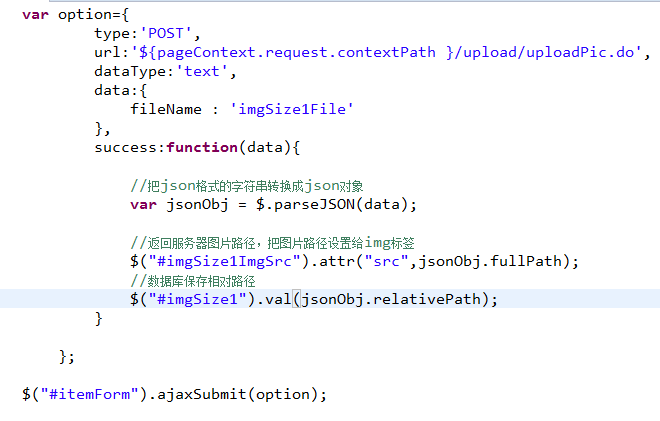
uploadController
使用jersy服务器进行跨服务器上传:
@Controller
@RequestMapping("/upload")
public class UploadController {

@RequestMapping("uploadPic")
public void uploadPic(HttpServletRequest request,String fileName,PrintWriter out){
    //把Request强转成多部件请求对象
    MultipartHttpServletRequest mh = (MultipartHttpServletRequest) request;
    //根据文件名称获取文件对象
    CommonsMultipartFile cm = (CommonsMultipartFile) mh.getFile(fileName);
    //获取文件上传流
    byte[] fbytes = cm.getBytes();

    //文件名称在服务器有可能重复?
    String newFileName="";
    SimpleDateFormat sdf = new SimpleDateFormat("yyyyMMddHHmmssSSS");
    newFileName = sdf.format(new Date());

    Random r = new Random();

    for(int i =0 ;i<3;i++){
        newFileName=newFileName+r.nextInt(10);
    }

    //获取文件扩展名
    String originalFilename = cm.getOriginalFilename();
    String suffix = originalFilename.substring(originalFilename.lastIndexOf("."));

    //创建jesy服务器,进行跨服务器上传
    Client client = Client.create();
    //把文件关联到远程服务器
    WebResource resource = client.resource(Commons.PIC_HOST+"/upload/"+newFileName+suffix);
    //上传
    resource.put(String.class, fbytes);


    //ajax回调函数需要会写写什么东西?
    //图片需要回显:需要图片完整路径
    //数据库保存图片的相对路径.
    String fullPath = Commons.PIC_HOST+"/upload/"+newFileName+suffix;

    String relativePath="/upload/"+newFileName+suffix;
    //{"":"","":""}
    String result="{\"fullPath\":\""+fullPath+"\",\"relativePath\":\""+relativePath+"\"}";

    out.print(result);


}


修改图片服务器文件上传权限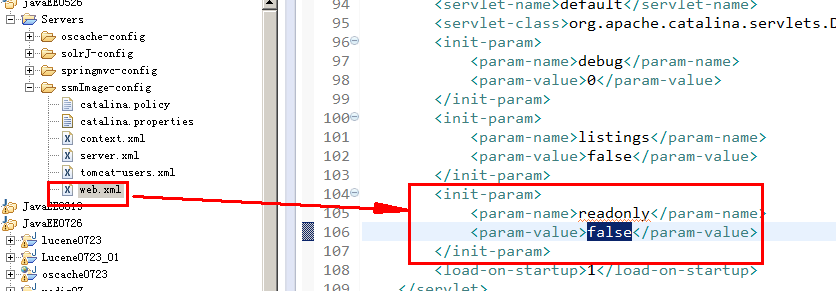
图片上传位置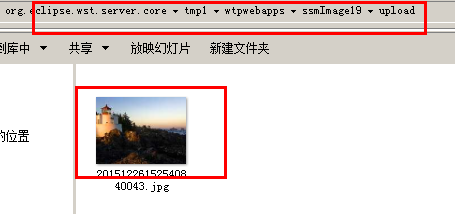
页面缓存
简单理解缓存原理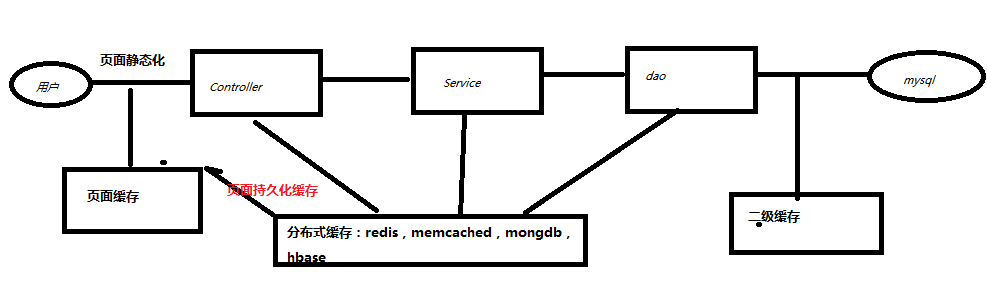
互联网架构
页面缓存
使用Oscache实现页面缓存。
测试页面缓存
创建web工程,导入jar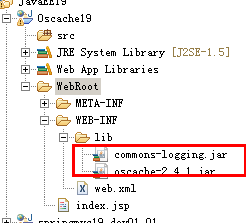
测试
创建一个index.jsp页面,使用时间来测试: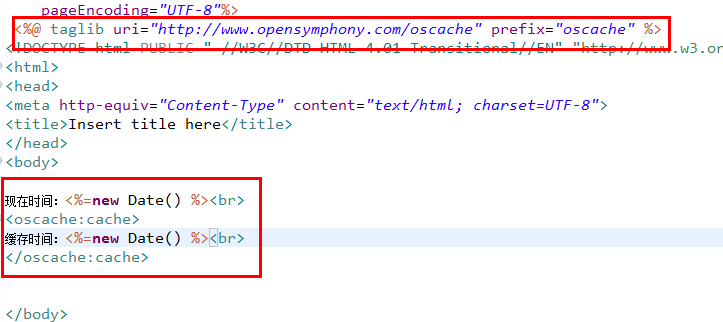
访问地址
http://localhost:8080/Oscache19/index.jsp
http://localhost:8080/Oscache19/
分析:上面2个地址都访问同一个页面,为什么缓存会变化?
缓存原理:
缓存数据结构:map,key存储浏览器访问url,上面2个url不一致,缓存肯定变化。
Value:缓存页面数据

存储范围
缓存默认存储在application域当中。


改变缓存Session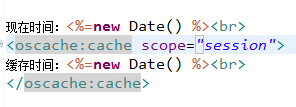
固定缓存key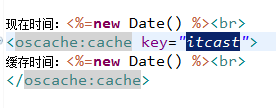
每隔4秒同步一次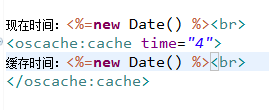
缓存持久化
创建oscache.properties
这个配置文件必须在classpath下面: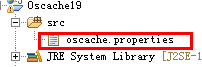
cache.memory=false
cache.persistence.class=com.opensymphony.oscache.plugins.diskpersistence.DiskPersistenceListener
cache.path=F:\\cache


持久化文件
Oscache整合ssm项目
约定:商品页面访问量特别大,给商品页面缓存。
  Items路径下所有请求都缓存。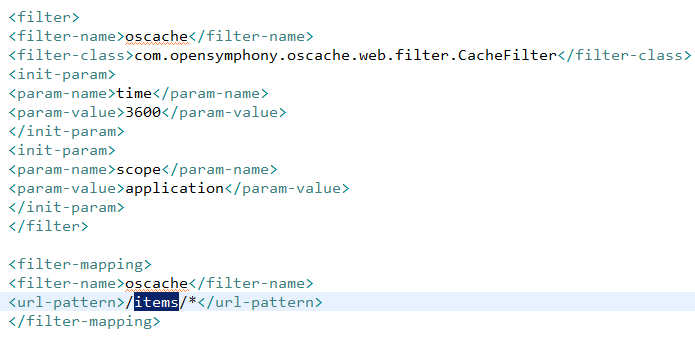
测试缓存:
打一个断点(给商品查询列表),第一次断点必须走,第二次断点不走,走缓存页面。

Springmvc的freemarker支持
分析:需要jar
Freemarker的jar,context-support.jar

配置freemarker视图支持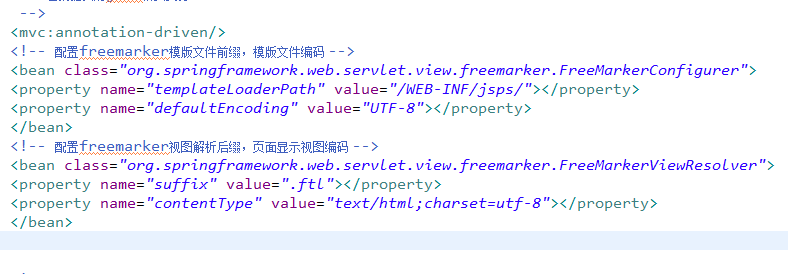
编写freemarker页面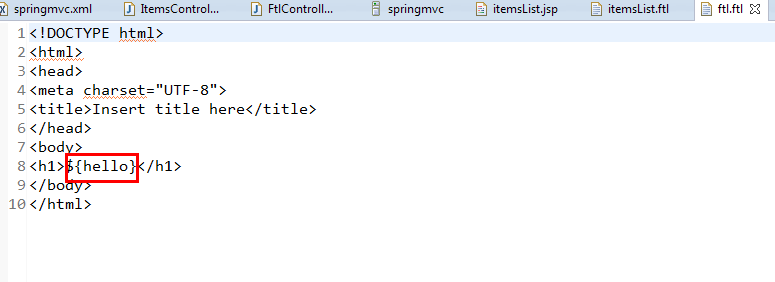
代码
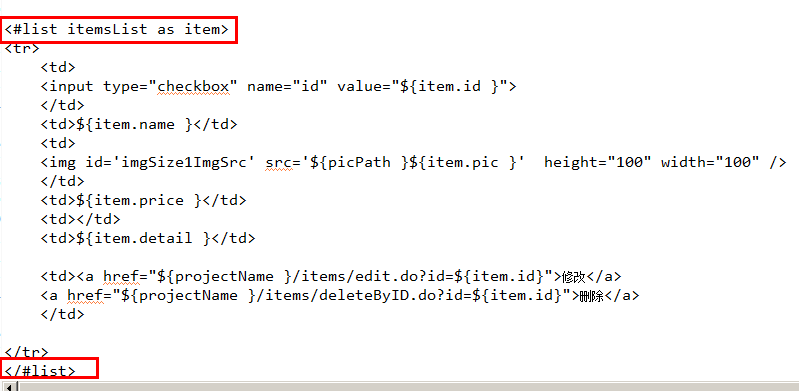
修改itemsList页面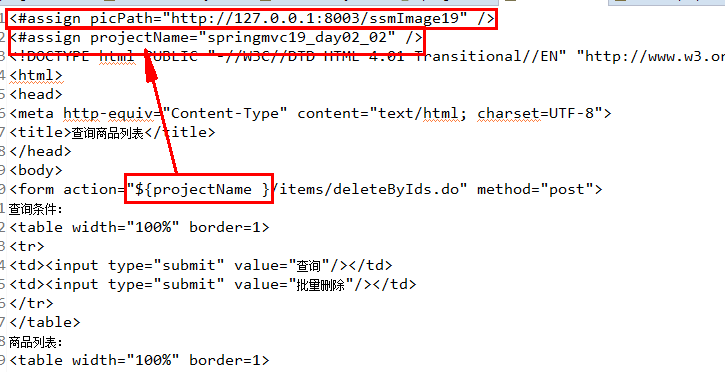
拦截器
局部拦截器
针对单个处理器映射器,就叫局部拦截器。
全局拦截器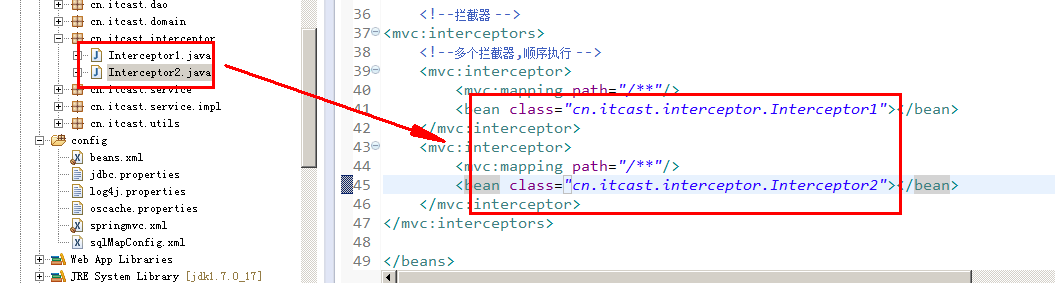
测试
第一个拦截器放行,第二个拦截器也放行:

这是第一个拦截器Interceptor1。。。preHandle
这是第二个拦截器Interceptor2。。。preHandle
这是第二个拦截器Interceptor2。。。postHandle
这是第一个拦截器Interceptor1。。。postHandle
这是第二个拦截器Interceptor2。。。afterCompletion
这是第一个拦截器Interceptor1。。。afterCompletion


第一个拦截器放行,第二个不放行:

Springmvc规定:凡是preHandle返回true,afterCompletion必须执行。

这是第一个拦截器Interceptor1。。。preHandle
这是第二个拦截器Interceptor2。。。preHandle
这是第一个拦截器Interceptor1。。。afterCompletion